
Professional PCB manufacturing and assembly
Building 6, Zone 3, Yuekang Road,Bao'an District, Shenzhen, China
+86-13410863085Mon.-Sat.08:00-20:00

Explanation of standard requirements for coating thickness of three proofing paint in PCBA processing
In PCBA processing, the normal coating thickness of most PCB products is 25 to 127 microns, and the coating thickness of some products is lower. The specific thickness depends on the actual use scenario and customer requirements.
How to use tools to measure the coating thickness of three proofing paint?
The circuit board must use the thinnest coating material to provide maximum protection, so as to minimize heat retention, additional weight increase and various other problems. There are three main methods to measure the thickness of conformal coatings.
1. Wet film thickness gauge
The wet film thickness can be measured directly with a suitable instrument. These gauges contain a series of notches, each tooth having a known calibrated length. Put the measuring instrument directly on the wet film to measure the film, and then multiply the measured value by the solid percentage of the coating to calculate the approximate dry coating thickness.
2. Micrometer
Before and after coating, micrometer thickness measurements are made at several locations on the circuit board. The cured coating thickness minus the uncoated thickness is divided by 2 to obtain the thickness of one side of the plate. The measured standard deviation is then calculated to determine the uniformity of the coating. Micrometer measurements should preferably be made with a harder coating that will not deform under pressure.
3. Ultrasonic thickness gauge
This gauge uses ultrasonic waves to measure coating thickness. It has the advantage over the eddy current probe because it does not require a metal back plate. The thickness depends on the amount of time it takes for sound to travel from the transducer, pass through the coating, and reflect back from the PCB surface. This method is relatively safe and will not damage PCB.
The thicker the coating thickness is, the better the effect is. Many users are misled into thinking that the thicker the better. In fact, it is not certain that the three proofing paint can be divided into acrylic three proofing paint, organic silicon three proofing paint, polyurethane three proofing paint, etc. Different types of three proofing paint have different requirements for coating thickness, and different industries have different requirements for coating thickness of three proofing paint.
Because the coating thickness of each type of product has different requirements in the use process, the coating thickness of each type of product is also different in different environments and different needs.
For example, for ordinary electronic products, the requirements for three proofing paint are not very high, and there is no special thickness requirement when coating. Generally, the thickness of 20-30 microns can meet the requirements. If there are special requirements, multiple coats can be applied, and the second coat shall be applied after the three proofing paint on the board is completely cured.
Industrial products and military products have relatively high requirements for the performance of the three proofing paint, with the coating thickness of about 30-50 microns. At the same time, select the three proofing paint type with relatively better performance, which will play a better role in protecting PCB.
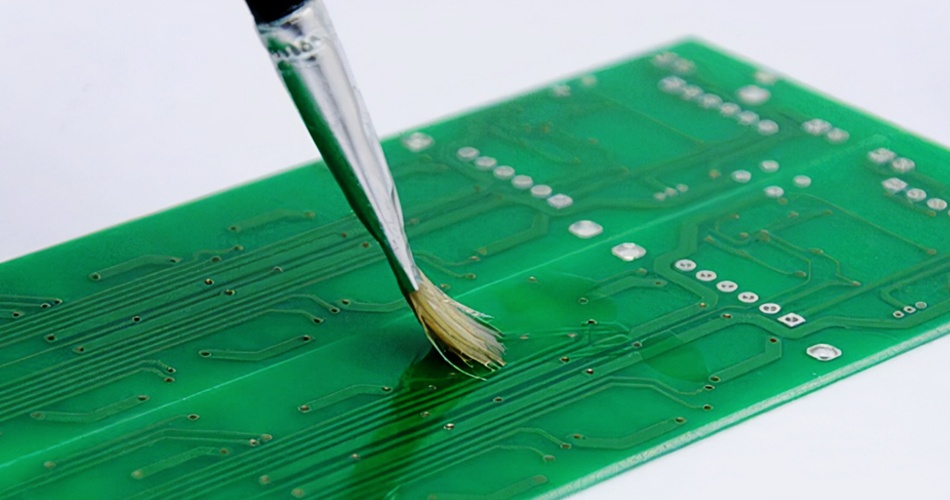
Spraying steps of three proofing paint
Step 1: Clean the board surface and keep it free of oil dirt and dust (mainly the flux composition in the residual soldering tin during the welding process, because the following acidic substances will affect the durability of components and the adhesion between the three proofing paint and the board surface,
Step 2: drying, drying the cleaned detergent and water to ensure the dryness of the board surface,
Step 3: Prepare the three proofing paint with proper viscosity according to the data provided by the manufacturer of the three proofing paint. It is recommended to adjust the viscosity to 15-18 seconds (paint 4 # cup) at a proper proportion, stir it evenly, and then let it stand for 3-5 minutes to let the bubbles disappear completely before it can be put into the inside of the spray gun for spraying. If you use a brush, it is recommended to buy a soft wool brush, (The bristly pig hair brush should have rough hair and brush marks on the hard brushed paint film surface. The surface of the paint film is not smooth, which will affect the appearance. In addition, the pig hair brush will generate bubbles if it is used too hard during construction.)
Step 4: spray. The three proofing paint is filtered with 200 mesh gauze and poured into the spray pot. Adjust the air pressure of the spray gun and the shape of the spray. If the air pressure is too low, the three proofing paint cannot be atomized easily, and the paint film will have small pits, especially when the viscosity of the paint is higher, It is similar to the surface of orange peel (the appearance of orange peel will also appear when there is oil stain on the board). When the air pressure is too high, the three proofing paint will be blown off the surface by the air pressure, and the paint will appear in piles, and sagging will occur during the drying process. It is recommended to adjust the spray shape of the spray gun to fan shape, move the spray gun at a constant speed at an angle of 45 ° between the nozzle and the panel surface to make it evenly sprayed on the panel surface. After the first gun is sprayed, go back to the second gun to make the paint mist of the second gun press the paint film of the first gun, and so on until the panel surface is completely sprayed, so as to ensure that the paint film is uniform and will not leak. The spray gun shall not run too fast to ensure that the paint film has a thickness of at least 50 microns according to the data of the three proofing paint.
Step 5: Baking: After spraying the board surface, enter the baking oven for baking. Set the curve baking temperature according to the data provided by the three proofing paint manufacturer. If the three proofing paint is self drying, it is recommended to stand outside for 3-5 minutes and then enter the baking oven that does not exceed 80 degrees for 5-10 minutes. If it is a tunnel furnace, it is recommended to set the temperature at 60 degrees in the front area, 80 degrees in the middle area, and 70 degrees in the rear area. If the sprayed board is directly baked at high temperature, the paint film on the surface will dry faster than the paint inside, which is equivalent to a film wrapping the underlying paint inside. When the solvent in the bottom layer of the paint needs to volatilize during the drying process, it will blow through the surface film and form many pores and bubbles.
Step 6: Check the plate collection. Take the plate out of the baking oven to check whether there is any air bubble. If the paint film on the plate is uniform and complete, it is qualified.
Baking temperature of three proofing paint
At room temperature, the surface is dried for 10 minutes and cured for 24 hours. If you want to speed up, you can bake at 60 ℃ for 30 minutes to meet the curing requirements. The three proofing paint with good quality can be completely cured after baking at 80 ℃ for half an hour.
The above is the standard requirements for coating thickness of three proofing paint in PCBA processing explained to you by the circuit board manufacturer.
Car gauge chip in PCBA processing
Oct 26,2022


Just upload Gerber files, BOM files and design files, and the KINGFORD team will provide a complete quotation within 24h.