
Professional PCB manufacturing and assembly
Building 6, Zone 3, Yuekang Road,Bao'an District, Shenzhen, China
+86-13410863085Mon.-Sat.08:00-20:00

Mechanical keyboard processing factory on mechanical keyboard PCB 2021 guide
This article "Mechanical keyboard processing factory on mechanical keyboard PCB 2021 Guide" is the author of Shenzhen Runze Wuzhou Electronic Technology Co., LTD. PCBA edited, welcome to read the following
Mechanical keyboard PCB Introduction:
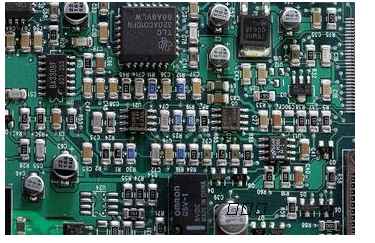
A mechanical keyboard is so precise with special haptic feedback that it allows you to have super fast and precise execution of every click, and in its duration than any other keyboard again so by a keyboard type. Demand is growing every day due to its unique architecture, incredible durability and super-fast responsiveness.
Depending on the switch, there are usually two types of computer keyboards. The first is the thin-film keyboard, which is readily available in the market, which is why it is used in all situations. The other is a mechanical keyboard. Currently, there is no substitute for a gaming mouse and mechanical keyboard for gamers. Many people are interested in using mechanical keyboards for all the reasons of response time, build quality, appearance, and RGB. Because it doesn't look like a traditional keyboard, it costs more than a regular keyboard. Mechanical keyboards are now widely used by gamers, but are now used by many content creators. In gaming or typing, mechanical keyboards bring a whole new typing experience. But, depending on the price, brand of switch, and type of switch, the pleasure of using a mechanical keyboard varies. And, if you have RGB leds on the keyboard, you can change the key color as desired. Mechanical keyboards are usually made of printed circuit boards and switches. Metal objects and springs are used inside the switch. The key is registered when two metal objects touch it. Because the mechanical keys are located on the printed circuit board, the switch can be replaced if it does not work. One of the main differences between mechanical and film keyboards is that, unlike mechanical keyboards, they don't have a separate key switch. Place the rubber dome on top of the film sheet to register it on the keyboard when the key is pressed.
For mechanical keyboards, there are three types of keyboard switches.") https://www.kingfordpcb.com/yuan.php?time=1685970626
https://www.kingfordpcb.com/yuan.php?time=1685970626
These three types of switches have some unique characteristics called switch colors.
Linear: Black Cherry MX, Red MX, Linear Gray MX, Logitech R G
Touch: Cherry MX Brown, MX Clear, MX Tactile, Razor Orange GT
Click Switch: Razor Cherry MX Blue, MX Green, MX White and Chroma Green GT.
This is Logitech's Cherry, Razor is the switch manufacturer's brand. One of the most popular is the Cherry MX Switch. Cherry is a company based in Germany. Many Chinese switch manufacturers also make mechanical switches in the form of Cherry MX switches. For example, Otemu, Gritech, GETRON, etc. Best of all, there are now optically mechanical switches that feel similar to mechanical keyboards, and keyboards that claim to have faster response times. However, depending on the name of the switch, the switch will be clickable, silent, or palpable. In most cases, when we say toggle click, we mean the blue switch. The click provides comfort when typing on a keyboard. Tactile switches don't usually have a clicking sound, but they do have tactile feedback. Like Cherry MX Brown or Razor Orange Switch. Linear switches, on the other hand, are quiet and have no clicks or feedback like linear switches. Like Cherry MX Black, MX Red, the IBM keyboard was one of the first known for its capacitive induction beam-spring switch in the early 1970s. Previously, on keyboards, capacitive sensing technology was similar to touch screen technology, and it worked exactly like a touch screen, but there was a small pad underneath the switch under the finger that simulated your finger, rather than your finger touching the screen directly with your finger. To increase the electrode capacitance. Eventually, the technology gave way. Beam springs behave in a unique way. When pressed, some internal parts will reverse and rise. The keyboard feels almost like using a typewriter. The real goal of developing something that feels like a real typewriter. Most people were familiar with the sound and nose of typewriters. The keyboard is beautiful because it has two keystrokes, a separate space bar and a whopping 10 pounds. She's louder than the IBM model. It also uses a solenoid that triggers with each click, making a louder noise and giving it a more printed feel. But the size and weight of the keyboard are impractical. And it was expensive, costing $1,500 in 1970, or $8,000 in today's market. IBM has been making some of the best keyboards for decades, and the Model F switch is one of the best. The main goal was to provide the same typewriter feel at a lower cost in a more compact size box, and this approach was successful. Today, professional typewriters prefer mechanical keyboards because in film keyboards, it is very likely to drop when pressed, meaning that you think you have pressed but cannot use it because the film cannot reach the keys, but in mechanical keyboards there is a great possibility. If you click the switch, it will certainly respond to the possibility due to its unique mechanism. Now we will discuss the PCB for the mechanical keyboard. How do we design mechanical keyboard PCB? How to build a custom mechanical keyboard and how to make a Bluetooth mechanical keyboard.
How to design mechanical keyboard PCB:
There are a few steps to follow before designing a PCB for a mechanical keyboard.
Software configuration:
We will use KiCad to design the keyboard PCB. So download and install it first so that you can follow all the techniques and tips we share. KiCad is now one of the most widely used pieces of software for design purposes. As a result, you can get plenty of tutorials on how to design in Kicad software. If you already have it installed, we're ready to get started. One thing you want to do is make sure you have all the official KiCad libraries.
Scheme:
Start KiCad, and you'll see a screen with many options. Now click the new project. Then give your project its own name, such as Keyboard PCB or whatever you like. Now we will design the schematic. So be careful
First, double-click on the ".sch "file, and you see a completely blank table.
Mechanical keyboard processing factory on mechanical keyboard PCB 2021 refers to Now we must add a component library. If you look at the top of the window, click Preferences. Component Library. Now click Add, and then try to find the "keyboard_parts.lib" file from the house library. You can then follow the software's instructions and suggestions. There are so many tutorials on the Internet that you can easily view and install libraries
Now, to get started, we will suggest a list of basic commands
"M: Lift the component and move
Then click Place. Component. Now you can see that your steed looks like a pencil. Simply click anywhere on the page to find ATMEGAGA32U4 in the Library Usage installation
Mechanical keyboard processing factory on mechanical keyboard PCB 2021 guide Click OK, and then click the principle diagram to place the component. We must edit the component and change the reference from U to U
.We're going to place the glasses. Glass is a very important part of all the components available on the keyboard PCB. Because it determines the speed of keyboard play. Now we place the component "XTAL_GND" next to the controller. Simply change the reference to X
One thing to keep in mind is that too much noise is likely to interfere with the controller's signal. Therefore, use two decoupling capacitors to avoid this situation. Now we will use a crystal with a charging capacitor of 18pF so that the decoupling capacitors C1 and C2 we need are 22pF. Finally, we will add a GND symbol and then join all inside
Mechanical keyboard processing factory on mechanical keyboard PCB 2021
south
Next, we will add four 0.1uF decoupling capacitors C1, C2, C3, C4 and a 4.7uF capacitor called C7. You can see all these capacitors in the figure below (Figure 4)
.Mechanical keyboard processing factory on mechanical keyboard PCB 2021 guideTake a look at pin 13. This is the reset pin. We want to add a pushbutton switch to this pin so that we can easily reset it if we need to. To do this, we'll add a switch "SW_PUSH" and name it SW1. Now we must add a 10k pulp register using this switch named R1. Therefore, Figure 5 will look like this
Show:
Mechanical keyboard processing factory on mechanical keyboard PCB 2021 guide Now we must add a USB port. So, go to the library and select 'usb_mini_micro_B' and add it to the worksheet and name it J1. Now, if you look at USB, there are various pins, such as VUSB, D-, D +, ID, GND, SHIELD. Now, connect the VUSB to the VCC and then to the UVcc of the controller. The D- and D + from the controller and USB will be connected to two 22 ohm resistors called R1 and R2. The GND and shielding layers will be short-circuited and then connected to the UGND and UCap of the controller via the 1uF capacitor. Everything is shown in Figure 6: After that, Check that all VCC connections and GND connections are properly connected and you can proceed to the next step. However, if they are not connected, connect them correctly. Keep in mind that if you use a built-in ADC, you may need to place a capacitor between the AVCC and the VCC. Here we are
Without him.
Mechanical keyboard processing factory on mechanical keyboard PCB 2021 guide Now we will organize the switch matrix. For the purposes of this tutorial, we will show you the 2X2 matrix. So first go to the library and select "KEYSW" for the switch and "D" for the diode component. Now to attach them to K1 and D1 respectively, K2 and D2, which, as we said before, are two 2 by 2 matrices, then we have to do the same for K3, K4, D3 and D4.


Just upload Gerber files, BOM files and design files, and the KINGFORD team will provide a complete quotation within 24h.