
Professional PCB manufacturing and assembly
Building 6, Zone 3, Yuekang Road,Bao'an District, Shenzhen, China
+86-13410863085Mon.-Sat.08:00-20:00

Today, let's talk about the appearance of tin balls in the process of SMT patch processing, and analyze the causes of appearance and formation:
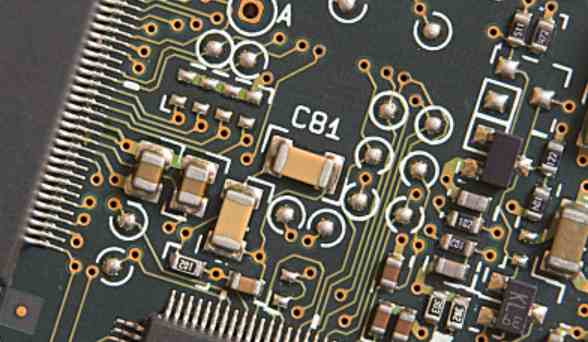
1, the main reason for the general SMT steel mesh tin ball is that in the solder joint forming process, the molten metal alloy for various reasons and "splash" out of the solder joint, and the formation of many scattered small solder balls around the solder joint. They are often clustered and discrete in the form of small particles stuck in the flux residue around the end of the component or pad.
2, tin bead refers to some large solder ball in the solder paste welding, solder paste may collapse, extrusion and other reasons beyond the printing pad, in welding, these exceed the solder paste in the welding process failed to melt together with the solder paste on the pad and independent, formed in the element body or near the pad, But most of the tin beads occur on either side of the chip element.
Take the chip element with square pad design as an example, as shown in Figure 2 below. After the solder paste printing, if there is more solder paste, it is easy to produce tin beads. The solder paste beyond the pad is divided into two parts, which are the extension part of the pad (blue area) and the extension part of the pad (yellow area). The red area is the actual pad area.
For the solder paste of the epitaxial part of the pad, as long as the solder paste of the pad part is fused together with the solder paste when forming a Fillet during welding, the tin bead will not be formed. For the inner extension part of the disc, when the amount of solder is small, the solder paste can form a Fillet with the welding end of the component; But when the amount of solder, the element placement pressure will squeeze the solder paste to the element body (insulator) below, in the flow welding heat melt, due to the surface energy, melting solder paste into a ball, it has a tendency to raise the element, but the force is very small, the element gravity squeeze to both sides of the element, separated from the pad, in the cooling of the formation of tin beads. If the element gravity is large and more solder paste is extruded, it will even form multiple SMT laser steel mesh tin beads.
How to use BGA signal routing technology efficiently in PCB design
Calculate the number of routes through a given channel area. (Note: Number of Traces: number of traces
-Sheldon: Formula.
Space width: space width
Trace width: indicates the cable width
Many routes can be routed through different channels. For example, if the BGA spacing is not very fine, one or two lines can be laid, sometimes three. For example, for BGA with 1mm spacing, multiple routes can be distributed. However, with today's advanced PCB design, most of the time there is only one route per channel.

Once the embedded designer has determined the wire width and spacing, the number of wires to be routed through a channel, and the type of holes to be routed for the BGA layout design, he or she can estimate the number of PCB layers required. Using a smaller number of I/O pins than the maximum reduces the number of layers. If wiring is allowed at the first and second levels, then the wiring of the two outer boundaries does not require the use of holes. The other two perimeters can be wired at the bottom.
Third, the designer needs to maintain impedance matching as required and determine the number of wiring layers to be used to fully decompose the BGA signal. Next use the top layer of the board or the layer where the BGA is placed to complete the wiring of the outer ring of the BGA.
The remaining internal parameters are distributed on the internal wiring layer. The number of layers needed to complete the entire BGA wiring needs to be fairly estimated based on the amount of internal wiring within each channel.
After the outer ring wiring is finished, lay the next ring. A set of diagrams in FIG. 4a and FIG. 4b describe how PCB designers route different BGA circles, starting from the outermost and working all the way to the center. The first diagram shows how the first and second inner rings are wired. Then route subsequent inner rings in the same way until all BGA wiring is completed.
In some designs where electromagnetic interference (EMI) is taken into account, the outer or top layer cannot be used for wiring, even the outer ring. In this case, the top floor is used as the ground plane. EMI includes a product's susceptibility to external electromagnetic fields, which generally pass from one product to another through coupling or radiation, often causing the latter product to fail the conformance test. Products can be considered to meet the requirements of EMC specifications only if they meet the following three criteria:
Does not interfere with other systems
Not affected by radiation from other systems
It doesn't interfere with itself.
In order to prevent the product from receiving and receiving interference signals, it is recommended to take shielding measures on the product. Shielding generally refers to the metal shell completely wrapped around the entire electronic product or part of the product. However, in most cases filling the outer surface of the ground can also act as a shield because it attracts energy and minimizes interference.
It is used for the perforation technique in the pan with ultra-fine spacing
When BGA signal escape and wiring is performed using the in-disk through-hole technique, the through-hole is placed directly on the BGA pad and filled with a conductive material (usually silver) and provides a flat surface.

20H and 3W principles of PCB design
May 23,2023

Just upload Gerber files, BOM files and design files, and the KINGFORD team will provide a complete quotation within 24h.