
Professional PCB manufacturing and assembly
Building 6, Zone 3, Yuekang Road,Bao'an District, Shenzhen, China
+86-13410863085Mon.-Sat.08:00-20:00

The difference between PCB welding aid layer and welding resistance layer?
1. Welding resistance layer:
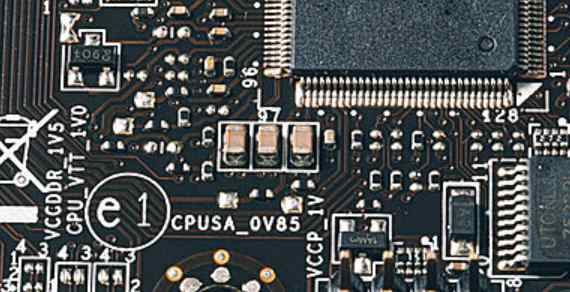
solder mask: It refers to the part of the board that will be coated with green oil. Because it is a negative output, the part that is solder mask will not be coated with green oil. It is silver-white. (That is to say, where there is a solder shield, there will be no green oil but tin plating)
2. Welding aid layer:
paste mask: It is used when the machine is pasting, and it corresponds to the pad of all the patch components. The size is the same as the toplayer/bottomlayer layer, and it is used to open the steel mesh and leak tin.
Key points: Both layers are used for soldering on tin, not referring to a tin, a green oil; So is there a layer refers to the layer of green oil, as long as there is a layer on an area, it means that the area is insulated green oil? I haven't come across such a layer yet! The solder plate on the PCB board we painted will all solder layer by default. Therefore, the solder plate on the PCB board manufactured is coated with silver solder, and it is not surprising that there is no green oil. However, the wiring part on the PCB board we drew only has toplayer or bottomlayer layer, rather than solder layer, but the wiring part of the PCB board made is coated with green oil.
It can be understood in this way: 1. The solder resistance layer means that the window is opened on the green oil of the whole piece of solder resistance, in order to allow welding!
2. By default, green oil should be applied to areas without solder resistance layer!
3. paste mask layer is used for patch encapsulation! SMT packaging uses toplayer layer, topsolder layer, and toppaste layer. toplayer and toppaste are the same size, but toppaste is larger than them.
What is a solder mask?
Solder masks, also known as flux resisters or solder resisters masks/coatings, are thin layers covering copper trace wire that eliminate the need to weld on top and bottom side printed circuit boards (PCB) to help ensure PCB reliability and high performance. Resin is often chosen as the main material for solder resistance films because of its excellent performance in moisture resistance, insulation, welding resistance and high temperature resistance, as well as aesthetics.

It is believed that most PCBS that are thought to be green are actually the color of solder resistance oil green oil. However, the solder mask can be displayed in different colors, including green, white, blue, black, red, yellow, etc. Apply different colors according to different needs. For example, during the NPI stage (to make them different from mass-produced plates), some RDS tend to pick up red solder mask for the prototype during the NPI stage. Black solder mask was chosen only to be compatible with the color of the final product housing when these plates need to be partially or fully exposed.
Even the two sides of the same plate may contain welding masks of different colors. Take Arduino Uno boarding an enemy as an example:
Function of solder mask
Due to the market demand for volume and efficiency, welded masks are becoming increasingly popular and important for boards, as the density of board rockets and SMT (surface mount technology) begin to emerge as the leading choice.
As its name suggests, welding masks are designed to prevent welding Bridges from occurring in covered areas. Reflow soldering plays a key role in SMT assembly as it enables the electronic components to be fitted to the board with complete accuracy through the solder paste. If a solder mask is not used, the copper stitch wire tends to attach to the solder paste, which can cause a short circuit. Therefore, the reliability and performance of the assembled PCB will be included.
In addition to its primary responsibility, the solder mask also prevents oxidation, corrosion and fouling of the copper trace.
Welding resistance film manufacturing process
Some people think that making solder mask is not a cutting-edge technology, and many engineers can do it at home. It's never too late to realize that this is a complete myth. Welding Mask DIY is only suitable for simple design circuit boards, and it is somewhat difficult to ensure the reliability of the product unless it is formally applied in the final project.
For professional PCB manufacturers, welding resistance film manufacturing has never been easier. On the one hand, strict regulations such as ISO9001, UL or RoHS must be followed. Welding resistance film manufacturing, on the other hand, consists of several stages, each of which requires highly mature technology, rich manufacturing experience and the latest equipment.
The common procedure for welding mask fabrication continues as described in the figure below.
Step 1: Clean the board. This step is designed to clean the surface of the board so as to remove rust or dirt while the surface remains dry.
Step 2: Solder resistance ink coating. Clean plates are then loaded into a vertical coater for welding mask ink coating. The coating thickness is determined by the reliability requirements of the circuit board, the field used by the PCB and the thickness of the circuit board. To make matters worse, the surface of the board was not as smooth as expected. Solder mask ink thickness varies when located on different parts of the board, such as on the trace line, on the substrate or on copper foil. Experience PCB manufacturers usually specify a specific coating thickness due to equipment capability and manufacturing experience considerations.
Step 3: Prehardening. Prehardening is not complete hardening, but is designed to make the coating relatively strong on the board so that unwanted coating can be easily removed from the board during the development stage.
Step 4: Imaging and hardening. At this stage, a transparent film with some circuit images is mounted on the board and exposed by UV. This process causes the welding mask partially covered by a transparent film to harden, while the cross section film covered by the circuit image remains prehardened. As a result, proper alignment must be ensured when hardening is performed to prevent short circuit or further impact on the final performance of the board from non-specified copper foil exposure.
Step 5: Grow. The PCB is then placed into the developer to remove unwanted solder masks so that the specified copper foil can be correctly exposed.
Step 6: Final hardening and cleaning. Final hardening is performed so that the usable solder mask ink is fully mounted on the PCB surface. The plate covered with solder resistance film must then be cleaned prior to further processing (e.g. surface treatment, assembly, etc.).


Just upload Gerber files, BOM files and design files, and the KINGFORD team will provide a complete quotation within 24h.